Connecting the dongle
USB Enumeration
When the dongle is connected to a USB port (either directly or through a USB Hub), the uThing::MNL™ firmware enumerates itself as a CDC-ACM device, so the operating system automatically detects the VCP capability and loads the corresponding CDC-ACM driver.
The result of this is a new “Virtual Comm Port” ready on the Host PC.
USB ID
On the current firmware version (v1.2.x), the device enumerates with the Vendor_ID: 0x0483 and Product_ID: 0x5740
uBridge
Either for a quick datalogging solution, or for painless software integration, consider the open source uBridge server. uBridge is a modular application that can log uThing's data into CSV files, publish into InfluxDB databases and MQTT servers with minimum configuration needed. In case you haven't seen it yet, please take a quick look here
Finding the VCP registered name
The exact name of the registered virtual device depends on the system, but below is a guideline to find the new device for different OS:
Linux
The exact assigned port name depends on the Linux distribution and number of VCP devices connected.
For instance, for Debian-flavored systems (Ubuntu, Raspbian, etc.), when the first ACM device is connected, the device is registered as /dev/ttyACM0. Another common name is /dev/ttyUSBx (where x is the number of the VCP, starting with 0).
The device name can be found with the commands ls /dev/ttyACM* or ls /dev/ttyUSB*
depending on the distribution.
MacOS
In MacOS, the exact assigned name depends on the number of VCP devices connected, and the connection topology (the numbering changes if the device is connected through a USB hub).
To find the device name use ls /dev/cu.usbmodem*
Windows
Open the Device Manager (Win "Windows-logo" key and search for “device”).
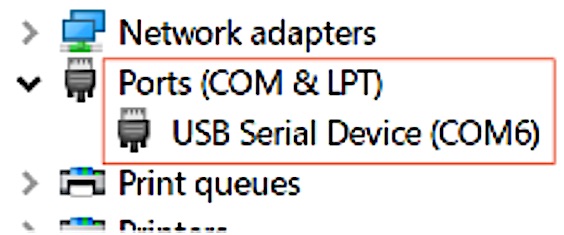
The VCP should be shown under Ports (COM & LPT) as a new USB Serial Device. The COM number depends on the system and the number of devices connected.
tip: Identifying the device when multiple uThings are connected
As mentioned before, the exact name of the assigned serial port can change when multiple devices are connected, so you can use either the device name (if only one uThing of the same type is connected) or the serial number (if multiple uThings of the same type are present). check the Status/Info commands for more details.
Obtaining sensors’ data
As soon as the device is plugged-in and the OS registers the VCP, the device automatically starts sending data over the virtual serial port with the default configuration of JSON format and sampling rate of 3 seconds.
There are basically 3 ways to interact with the Serial Port:
- Interactively, using a GUI or command line terminal application. Baud-rate and control lines are irrelevant since they aren’t used in ACM, just open the VCP in the terminal and start interacting. Use the keyboard to explore options and change configuration.
- Using the command line: No software installation is needed in Linux and MacOS (explained below).
- Programatically: Most programming languages (python, node.js, java, C, go, etc.) provide libraries that can be used to read and write data from a serial port.
Example: interacting and viewing sensor output data with the PuTTy application

Interacting with the device
In Linux and MacOS, the easiest way to start getting sensor data and changing configurations is through the command line:
Open a Terminal and find the device name. We will use "/dev/ttyACM0" in our examples.
Terminal for Linux/MacOS users
There are several serial terminal emulator applications for Linux. Some CLI-based apps are "minicom", "screen", "picocom" and GUI-based "CoolTerm" and "Zoc" (MacOS) and "Cutecom" (Ubuntu) to name a few.
Terminal for Windows users
There are several serial terminal emulator applications for Windows. Some are Putty, Teraterm and RealTerm to name a few.
Serial Port permissions in Linux
This depends on the actual distribution, but on some Linux systems, USB devices are mapped with read-only permissions by default. If you get an error message like the one below, this may be your case.

In order to interact with the device (write configuration, change modes), you need to give permissions to your user for accessing the serial port.
There are several ways to do this:
Add user to the dialout group
A simple solution is to add the current user to the "dialout" group (the command needs root permission):
$ sudo usermod -a -G dialout $USER
In case the serial port wasn't already in the dialout group, it can be added with
$ sudo chown root:dialout /dev/ttyACM0
The group and permission can be verified with ls -l /dev/ttyACM0
Which should return something like this if everything is fine:
crw-rw---- 1 root dialout 166, 0 Mar 30 23:27 /dev/ttyACM0
udev rule
An alternative is to implement a "udev rule":
$ echo '"SUBSYSTEM=="usb", ATTR{idVendor}=="0483", MODE="0664", GROUP="plugdev"' | sudo tee -a /etc/udev/rules.d/50-uThing.rules
$ sudo udevadm control --reload-rules
And add the current user to the plugdev group if it's not already there (then logout and re-login to apply this change):
$ sudo usermod -a -G plugdev $USER
Read sensors output
Using terminal emulator
Just open your preferer terminal. The sensor data should be presented on the default JSON format every 1 second (default reporting rate).
Linux / MacOS
Just to "read-only", you can use the cat command:
$ cat /dev/ttyACM0
The output should look something like this:
{"noise":{"rms":36.2,"peak":36.2,"base":25.9},"pir":{"detections":0,"detPerHour":110},"light":{"last":11.82,"average":11.10}}
tip: Storing data into a text-file
Similarly, the output data can be sent to a plain text file with the following command:
$ cat /dev/ttyACM0 > activity.log
Additionally, if the “&” symbol is added at the end of the command, the process will be forked, and the system will keep storing the data until the user logs out or the dongle is disconnected.
This trick could be very useful for quick datalogging. By first configuring the CSV format, then the generated file can easily be opened in Excel or any spreadsheet application.
Sending commands to the dongle
uThings provides two modes for sending the configuration commands (interactive and json). Both modes are always enabled, so the choice is up to the user's convenience. Please check the next section for a detailed list of the commands available.
Interactive mode
For simplicity, in interactive mode all commands are 1 character long, (plus the Enter,line-feed, '\n', ASCII 0x0D). Commands can be sent in an interactive way when a terminal application is being used (screen, minicom, PuTTy, etc.) just by entering the correspondent key and pressing Enter. The response is shown immediately on the output.
As an alternative, directly from the command line, use the following command, where “X” is the desired command to send:
$ printf 'X\n' > /dev/ttyACM0
For example, the "C" command will change the reporting to the CSV format, and the response should be the following:
*** Config: Set output format to CSV.
Format: [noise_rms], [noise_peak], [noise_base], [pir_detections], [pir_lastHourD], [light_last], [light_average]
JSON
The user should ensure that the string to send is a valid json object (programatically or you could use a linter to manually assemble a valid string, like https://jsonlint.com for instance).
For example, the following command will disable the LEDs:
$ printf '{"led":false}' > /dev/ttyACM0
The next section details all the available commands for each mode.